Bluetooth Low Energy
This feature is only available on certain products and models (not available with all devices).
Introduction
Bluetooth Low Energy (BLE) requires GATT software and a BLE peripheral device(such as a sensor broadcasting temperature data) in order to work. The BLE peripheral device should provide services, and then update them as required. The gatttool or libaries may be used to read and write to the BLE peripheral. This requires some prior setup and coding in order to operate.
The example here uses the Texas Instruments Sensortag CC2650, a connectivity kit for IoT sensors to connect to the internet via BLE. (see photo below). Refer to the Texas Instruments website. Go to the bottom of the page for a list of sensors and services. Click on the plus symbol to see the details of each sensor and its handles. The handles are used to control and read the sensor.
You must develop a custom application to read and accept the data from an IoT device. This code includes the hooks or handles. Your specific approach including desired programming language and related software for this process varies widely based on your application, hardware and software systems. See Application Development for more information.
For mLinux™, one option is to write a C/C++ application and use the BlueZ driver already provided on the device. Other options include writing a Python application and using the python gattlib library.
NOTE: For mLinux 3.x only, BLE does not work with Bluez 5 on a PC in compatibility mode. You must use Bluez 4.
BLE Setup and Start
1. Make sure the RS9113 is started with a BLE compatible mode of: 8, 9, 12, or 14. For this example, the choice is 14. If you reboot the system, verify that /etc/default/rs9113 still contains the correct value. NOTE: Once a WiFi connection is established, you cannot scan. Push the black plastic flap as seen here:
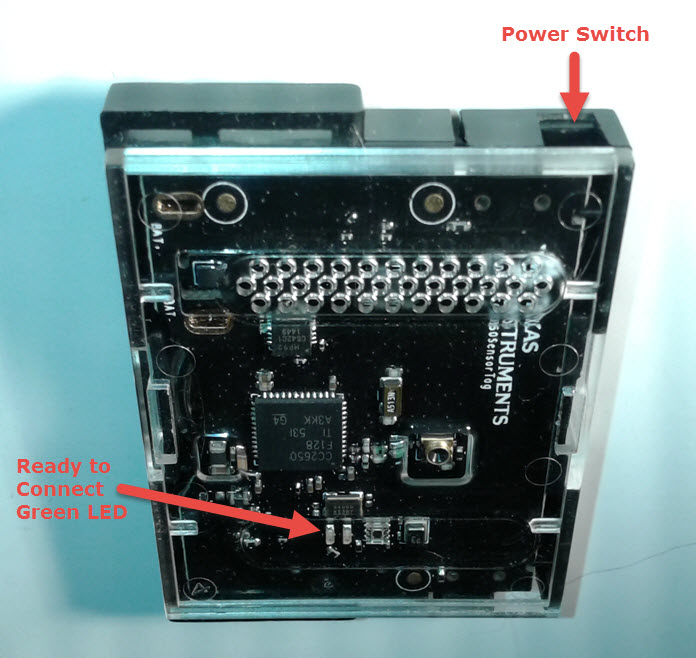
Photo of the Texas Instruments Sensortag CC2650 used in this BLE example.
For mLinux 4.x or higher, after step 1, follow these steps:
2.Edit /etc/default/bluetoothd and set BLUETOOTH_ENABLED=1
3.Start the bluetooth daemon:
sudo /etc/init.d/bluetooth start
To stop the bluetooth daemon (don’t do this if you wish to proceed on testing this):
sudo /etc/init.d/bluetooth stop
4. Now use bluetoothctl to find the BLE device.
sudo bluetoothctl
[bluetooth]# power on
Changing power on succeeded
[bluetooth]# scan on
Discovery started
[CHG] Controller 00:23:A7:EA:2E:D3 Discovering: yes
If the BLE device is advertising, you should soon see:
[NEW] Device B0:B4:48:C0:B0:82 CC2650 SensorTag
For mLinux 3.x, after step 1, follow these steps:
2. Put the BLE device in discoverable mode. The green led starts to blink.
3. Enter the following commands:
mtcdt: hciconfig hci0 up
mtcdt: hcitool -i hci0 lescan
The resulting output displays:
#LE Scan ...
B0:B4:48:C0:B0:82 (unknown)
B0:B4:48:C0:B0:82 CC2650 SensorTag
^C
4. Type <Ctrl-C> to end the scan.
Bring BLE up
To bring BLE up, enter the following command:
mtcdt: hciconfig hci0 up
Bring BLE down
To bring BLE down, enter the following command:
mtcdt: hciconfig hci0 down
BLE Reset
BLE resets automatically upon reboot.
Connect to the Sensor
Now you that you know the address of the BLE device (See BLE Setup and Start), you can connect.
1. To connect to the sensor, enter the following commands:
mtcdt: gatttool -i hci0  -b B0:B4:48:C0:B0:82 --interactive
[         ][B0:B4:48:C0:B0:82][LE]> connect
2. Once you connect, the blinking led stops. Enter the following command:
[CON][B0:B4:48:C0:B0:82][LE]> primary
The resulting output displays:
[CON][B0:B4:48:C0:B0:82][LE]>
attr handle: 0x0001, end grp handle: 0x0007 uuid: 00001800-0000-1000-8000-00805f9b34fb
attr handle: 0x0008, end grp handle: 0x000b uuid: 00001801-0000-1000-8000-00805f9b34fb
attr handle: 0x000c, end grp handle: 0x001e uuid: 0000180a-0000-1000-8000-00805f9b34fb
attr handle: 0x001f, end grp handle: 0x0026 uuid: f000aa00-0451-4000-b000-000000000000
attr handle: 0x0027, end grp handle: 0x002e uuid: f000aa20-0451-4000-b000-000000000000
attr handle: 0x002f, end grp handle: 0x0036 uuid: f000aa40-0451-4000-b000-000000000000
attr handle: 0x0037, end grp handle: 0x003e uuid: f000aa80-0451-4000-b000-000000000000
attr handle: 0x003f, end grp handle: 0x0046 uuid: f000aa70-0451-4000-b000-000000000000
attr handle: 0x0047, end grp handle: 0x004b uuid: 0000ffe0-0000-1000-8000-00805f9b34fb
attr handle: 0x004c, end grp handle: 0x0050 uuid: f000aa64-0451-4000-b000-000000000000
attr handle: 0x0051, end grp handle: 0x0058 uuid: f000ac00-0451-4000-b000-000000000000
attr handle: 0x0059, end grp handle: 0x0060 uuid: f000ccc0-0451-4000-b000-000000000000
attr handle: 0x0061, end grp handle: 0xffff uuid: f000ffc0-0451-4000-b000-000000000000
3. To get a list of details of characteristics, use the char-desc command. When using this command , it displays the handle they are at and their UUID:
[CON][B0:B4:48:C0:B0:82][LE]> char-desc
The resulting output displays:
[CON][B0:B4:48:C0:B0:82][LE]>
handle: 0x0001, uuid: 00002800-0000-1000-8000-00805f9b34fb
handle: 0x0002, uuid: 00002803-0000-1000-8000-00805f9b34fb
handle: 0x0003, uuid: 00002a00-0000-1000-8000-00805f9b34fb
handle: 0x0004, uuid: 00002803-0000-1000-8000-00805f9b34fb
handle: 0x0005, uuid: 00002a01-0000-1000-8000-00805f9b34fb

...

handle: 0x002f, uuid: f000aa22-0451-4000-b000-000000000000
...
4. To read the characteristics that are located at certain handle(s), enter the following command:
[CON][B0:B4:48:C0:B0:82][LE]> char-read-hnd 0x0001
[CON][B0:B4:48:C0:B0:82][LE]>
Characteristic value/descriptor: 00 18
[CON][B0:B4:48:C0:B0:82][LE]> char-read-hnd 0x0002
[CON][B0:B4:48:C0:B0:82][LE]>
Characteristic value/descriptor: 02 03 00 00 2a
5. You can also write characteristics that are located at certain handle(s): The first write command wakes up (activates) the humidity sensor on 01. The second write command puts the sensor to sleep on 00. The read commands is to simply confirm that the change happened.
[CON][B0:B4:48:C0:B0:82][LE]> char-write-cmd 0x2f 01
[CON][B0:B4:48:C0:B0:82][LE]> char-read-hnd 0x2f
[CON][B0:B4:48:C0:B0:82][LE]>
Characteristic value/descriptor: 01
[CON][B0:B4:48:C0:B0:82][LE]> char-write-cmd 0x2f 00
[CON][B0:B4:48:C0:B0:82][LE]> char-read-hnd 0x2f
[CON][B0:B4:48:C0:B0:82][LE]>
Characteristic value/descriptor: 00
[CON][B0:B4:48:C0:B0:82][LE]>
6. Enter the following commands to disconnect and exit. The green LED on the sensor starts blinking again:
[CON][B0:B4:48:C0:B0:82][LE]> disconnect
[   ][B0:B4:48:C0:B0:82][LE]> exit
mtcdt:
7. To save energy, turn off the sensor and the green light stops blinking.
Use the device as a server (not yet supported in mLinux 4.x)
For mLinux 5.x
Example GATT Server
This example only applies to mLinux 5.
GATT servers are typically sensors that transmit data to clients using Bluetooth Low Energy. In mLinux 5, it is possible to write a GATT service that sends data collected by the device to a remote GATT client. There are many standard GATT services defined. Here is a list: https://www.bluetooth.com/specifications/gatt/services
The sample server is only provided as a learning tool to demonstrate how to write a GATT server. Most GATT servers will need to read real sensors, most likely attached to the device.
https://github.com/Jumperr-labs/python-gatt-server
Prerequisites for the GATT Sample Server
You will need to acquire the python GATT server example from multitech.net. You will need a PC with a GATT client and Bluetooth capability. An alternative to a PC would be a 2nd Multitech device running mLinux that has Bluetooth capability, and the GATTTool installed.
An example of a GATT client for Linux is GATTTool. Another example is the Microsoft Bluetooth LE Explorer.
In Gnu-Linux, GATTTool is packaged with BlueZ .This example uses GATTTool from BlueZ.
Acquiring the python GATT Server Example for the device
The Example GATT server does not come with mLinux by default. The package for the GATT server is found in http://multitech.net/mlinux/feeds/5.0.0/all/ and the name begins with python-gatt-server.
The easiest way to install it is using the opkg command, if your device is on the internet, and can connect to multitech.net. Otherwise, download the file python-gatt-server_*.ipk from multitech.net and from there copy it to the device and install it.
mtcdt:~$ sudo opkg update
Password:
Downloading http://multitech.net/mlinux/feeds/5.0.0/all/Packages.gz.
Updated source 'mlinux-all'.
Downloading http://multitech.net/mlinux/feeds/5.0.0/arm926ejste/Packages.gz.
Updated source 'mlinux-arm926ejste'.
Downloading http://multitech.net/mlinux/feeds/5.0.0/mtcdt/Packages.gz.
Updated source 'mlinux-mtcdt'.
mtcdt:~$ sudo opkg install python-gatt-server
Installing python-gatt-server (1.0) on root.
Downloading http://multitech.net/mlinux/feeds/5.0.0/all/python-gatt-server_1.0-r0.0_all.ipk.
Configuring useradd.
PATH=${PATH}:/sbin:/usr/sbin
Configuring python-gatt-server.
mtcdt:~$ opkg files python-gatt-server
Package python-gatt-server (1.0-r0.0) is installed on root and has the following files:
/usr/libexec/bluetooth/python-gatt-server/gatt_server.py
/usr/libexec/bluetooth/python-gatt-server/gatt_server_example.py
/usr/libexec/bluetooth/python-gatt-server/exceptions.py
/usr/libexec/bluetooth/python-gatt-server/advertising.py
/usr/libexec/bluetooth/python-gatt-server/adapters.py
/usr/libexec/bluetooth/python-gatt-server/
Configuring Bluetooth on the device
Because we are using shell commands to write to files that are privileged, we will use a root shell:
mtcdt:~$ sudo -s
In /etc/default/bluetooth add the following line of text:
mtcdt:$ echo 'MOREOPTIONS="--experimental"' >>/etc/default/Bluetooth
And make sure bluetooth is enabled:
mtcdt:~$ sed -i "s/BLUETOOTH_ENABLED=0/BLUETOOTH_ENABLED=1/" /etc/default/bluetooth
Set the RS9113 Coexistence mode to a mode that supports BLE. These are 8,9,12, and 14.
For this example, I will pick 8.
mtcdt:~$ sed -i 's/^COEX_MODE=.*/COEX_MODE=8/' /etc/default/rs9113
mtcdt:~$ /etc/init.d/rs9113 restart
Determining the device’s BT address
We must know the device’s BT Address to reach it from the PC.
Log into the device, and as root do the following:
1. Start BT:
mtcdt:~$ /etc/init.d/bluetooth start
Starting bluetooth
bluetoothd
2. Find the BT device:
mtcdt:~$ bluetoothctl
Agent registered
3. Enter show command to display device BT address:
mtcdt:~$ show
Controller 00:23:A7:49:43:C1 (public)
        Name: MTCDT-Bluez
        Alias: MTCDT-Bluez
        Class: 0x00000000
        Powered: yes
        Discoverable: yes
        DiscoverableTimeout: 0x00000000|
        Pairable: yes
        UUID: Generic Attribute Profile (00001801-0000-1000-8000-00805f9b34fb)
        UUID: A/V Remote Control        (0000110e-0000-1000-8000-00805f9b34fb)
        UUID: PnP Information           (00001200-0000-1000-8000-00805f9b34fb)
        UUID: A/V Remote Control Target (0000110c-0000-1000-8000-00805f9b34fb)
        UUID: Generic Access Profile    (00001800-0000-1000-8000-00805f9b34fb)
        Modalias: usb:v1D6Bp0246d0532
        Discovering: no
mtcdt:~$ quit
The BT ADDR is: 00:23:A7:49:43:C1
Starting the Python GATT Server
On the device switch to the GATT server example directory:
mtcdt:$ cd /usr/libexec/bluetooth/python-gatt-server/
If you restart the python-GATT-server, you must first restart bluetooth.
Start the bluetooth server, and the python GATT server on the device:
mtcdt:$ sudo /etc/init.d/bluetooth restart
mtcdt:$ sudo ./gatt_server_example.py
On the device, you will now see output from the simulated battery function of the server, printing the battery status starting at 100, and counting down to zero.
Connecting to the Device from a PC Using BLE and using GATTTool
The fake battery level test is at UUID 2a19. The GATTtool char-desc command should find the file handle for this feature:
PC:~$ sudo gatttool -i hci0 -b 00:23:A7:49:43:C1 --interactive
[00:23:A7:49:43:C1][LE]> connect
Attempting to connect to 00:23:A7:49:43:C1
Connection successful
[00:23:A7:49:43:C1][LE]> char-desc
…
handle: 0x0016, uuid: 12345678-1234-5678-1234-56789abcdef1
...

handle: 0x0024, uuid: 00002a19-0000-1000-8000-00805f9b34fb
...
[00:23:A7:49:43:C1][LE]> char-read-hnd 0x24
Characteristic value/descriptor: 50
[00:23:A7:49:43:C1][LE]> char-read-hnd 0x24
Characteristic value/descriptor: 4c
[00:23:A7:49:43:C1][LE]>
On the device you will see:
...Battery level: 84
Battery level: 82
Battery level: 80
Battery level read: 80
Battery level: 78
Battery level: 76
Battery level read: 76
Battery level: 74
Battery level: 72
Battery level: 70
…
Note that 80 is 0x50, and 76 is the same as 0x4C.
There is a feature of the test server which allows writing a value, and reading it back. This is the dummy test characteristic, and it has UUID 12345678-1234-5678-1234-56789abcdef1. Likewise, char-desc command should find this UUID. It appears in the listing above, and in our case, the handle is 0x0016.
The following commands are executed in GATTtool on the PC:
[00:23:A7:49:43:C1][LE]> char-write-cmd 0x16 'a87b'
[00:23:A7:49:43:C1][LE]> char-read-hnd 0x16
Characteristic value/descriptor: a8 7b
[00:23:A7:49:43:C1][LE]> char-write-cmd 0x16 'fab4'
[00:23:A7:49:43:C1][LE]> char-read-hnd 0x16
Characteristic value/descriptor: fa b4
[00:23:A7:49:43:C1][LE]>
These reads and writes will be noted in the output of the test server on the device:
Battery level: 0
TestCharacteristic Write: dbus.Array([dbus.Byte(168), dbus.Byte(123)], signature=dbus.Signature('y'))
Battery level: 0
Battery level: 0
TestCharacteristic Read: dbus.Array([dbus.Byte(168), dbus.Byte(123)], signature=dbus.Signature('y'))
Battery level: 0
Battery level: 0
TestCharacteristic Write: dbus.Array([dbus.Byte(250), dbus.Byte(180)], signature=dbus.Signature('y'))
Battery level: 0
TestCharacteristic Read: dbus.Array([dbus.Byte(250), dbus.Byte(180)], signature=dbus.Signature('y'))
Battery level: 0
Battery level: 0
The fake battery eventually goes to zero.
[00:23:A7:49:43:C1][LE]> char-read-hnd 0x24
Characteristic value/descriptor: 00
Terminating the Python GATT Server
To terminate the python-GATT-server, enter <ctrl-C> on the device. Remember to restart the bluetooth daemon after you do this.
Finding the UUIDs in GATT Server Code
The uuid values and their associated code can be found on the device after installing the pyton-GATT-server in this location on the device. For example to find the Battery UUIDs:
mtadm:$ cd /usr/libexec/bluetooth/python-gatt-server/
mtadm:$ grep BATTERY gatt_server.py
BATTERY_UUID = '180f'
Service.__init__(self, bus, index, self.BATTERY_UUID, True)
BATTERY_LVL_UUID = '2a19'
self.BATTERY_LVL_UUID,
The UUIDs may be used to further inspect or write to the GATT server.
If you wish to use another Conduit, mLinux 3 provides GATTTool in the bluez4 package, and mLinux 4 and mLinux 5 provides GATTTool in the bluez5-noinst-tools package. The GATTTool is normally installed by default on the device.
For mLinux 3.x
You can use the device as a server and send data to your computer.
Note: These instructions were tested on Ubuntu 14.04 and do not work in Ubuntu 16.04.
To use the device as a server:
1. Set the COEX_ MODE of 8 for the rs9113 module (8 changes bluetooth config to a peripheral (slave) mode) in /etc/default/rs9113:
$             8      BT LE MODE /BT   LE   PER   MODE
COEX_MODE=8
2. Configure bluetoothd for GATT by entering this command:
mtcdt: grep -in gatt /etc/bluetooth/main.conf
63:$ Enable the GATT functionality. Default is false
64: EnableGatt = true
3. To tell the rs9113 module to advertise the device as a BLE device (setup advertising and discovery), enter the following command:
Note: leadv can only be used on the device in this test. If hcitool hci0 leadv is ever run on the PC, the Bluetooth dongle must be removed before gatttool can be run. Otherwise gatttool connect will always fail.
mtcdt: hciconfig hci0 up
mtcdt: hciconfig hci0 noleadv
mtcdt: hcitool -i hci0 cmd 0x08 0x0008 10 02 01 1a 0c ff 18 01 48 45 4c 4c 4f 57 4f 52 4c 44
mtcdt: hciconfig hci0 leadv
4. Check the status by entering this command:
mtcdt: hciconfig
The resulting output displays:
hci0:  Type: BR/EDR  Bus: USB
BD Address: 00:23:A7:49:5C:D9  ACL MTU: 27:10  SCO MTU: 0:0
UP RUNNING
RX bytes:462 acl:0 sco:0 events:38 errors:0
TX bytes:0 acl:0 sco:0 commands:38 errors:0
5. To find the device, log onto a PC with Linux and BLE and enter the scan command:
pc: sudo hcitool -i hci0 lescan
The resulting output displays:
LE Scan ...
00:23:A7:49:5C:D9 (unknown)
00:23:A7:49:5C:D9 SimpleBLEPeripheral
The MAC addresses highlighted in bold from the hciconfig output and the hcitool lescan output should match.
Bring up bluetoothd on the device
The files you need for this procedure are created by building the BlueZ 4 package.
1. Download the package bluez4-plugins_*.ipk onto the device from http://www.multitech.net/mlinux/feeds/3.3.7/arm926ejste/
2. Install the plugins:
opkg install bluez4-plugins_*.ipk
3. To start the bluetoothd daemon, enter the following command:
mtcdt: bluetoothd -n -d
A large of amount of data displays as output. Look for this specific line to confirm that gatt server started.
…
bluetoothd[5564]: src/attrib-server.c:btd_adapter_gatt_server_start() Start GATT server in hci0
...
4. This step requires BlueZ 4 already installed. Refer to Bluetooth page for instructions. Log into gatttool on your computer and connect to the device by entering the following commands:
mtcdt: gatttool -i hci0 -b 00:23:A7:49:5C:D9 --interactive
[   ][00:23:A7:49:5C:D9][LE]> connect
[CON][00:23:A7:49:5C:D9][LE]> primary
The following results display:
attr handle: 0x0001, end grp handle: 0x0008 uuid: 00001800-0000-1000-8000-00805f9b34fb
attr handle: 0x0010, end grp handle: 0x0010 uuid: 00001801-0000-1000-8000-00805f9b34fb
[CON][00:23:A7:49:5C:D9][LE]> characteristics 0x0001 0x0008
[CON][00:23:A7:49:5C:D9][LE]>
handle: 0x0004, char properties: 0x02, char value handle: 0x0006, uuid: 00002a00-0000-1000-8000-00805f9b34fb
handle: 0x0007, char properties: 0x02, char value handle: 0x0008, uuid: 00002a01-0000-1000-8000-00805f9b34fb
[CON][00:23:A7:49:5C:D9][LE]> characteristics 0x0010 0x0010
[CON][00:23:A7:49:5C:D9][LE]>
[CON][00:23:A7:49:5C:D9][LE]>
with 00:23:A7:49:43:C1