Creating a Custom Application
NOTE: Support for Node-RED/Node.js on Multitech AT91SAM9G25-based products was discontinued within mPower 5.3. For mPower 5.3.3 to 5.3.8, users can install Node-RED as a custom application. mPower 6.0 or later no longer supports this custom app option. For alternative code examples in Python, see Example Applications below.
Any instructions related to Node-RED/Node.js are still applicable for mPower MTCDT 5.2.1 and MTCAP 5.2.1 and earlier on all devices. And also applies to any non-AT91SAM9G25-based products.
The AEP firmware version 1.3 or later supports installing and running user-created custom applications as well as managing them from DeviceHQ®. You can disable Node-RED to save system resources.
Basic Requirements:
- Use a supported language: C/C++, Python, Nodejs* (Note: mPower 5.3.8 or lower supports Python 2.7.)
- For details on the latest supported version of Yocto, refer to Introduction to Yocto.
- The app can be installed either on an SD card or in flash.
- You can use an optional boolean variable to manage this or otherwise the app-manager takes care of it automatically based on the presence of an SD card. See manifest.json Details for more information.
- Application is packaged as a gzipped tar file containing all required files.
- Use the new
app-managerprogram on the Conduit to manage custom apps- This is exclusively used to install, uninstall, start, and stop custom apps.
*Note: Nodejs is not supported for Multitech AT91SAM9G25-based products with mPower 5.3 or higher.
Required Application Structure
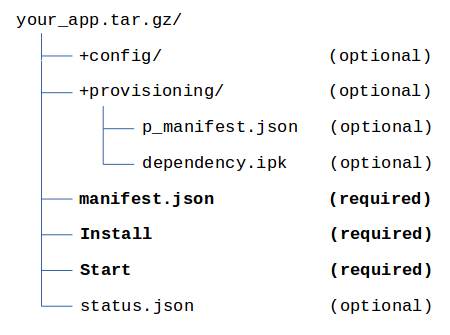
All required files must be present for successful installation.
How to Create a Custom Application
- Download the custom app SDK template and extract the enclosed template tarball into your application directory.
- Modify manifest.json to contain the information about your app. See manifest.json Details for more information.
- Set up app dependencies:
- If your app doesn’t have dependencies to install, remove the two sample IPK entries in provisioning/p_manifest.json
- If your app does have dependencies to install:
- Create IPK files of all dependencies and place them in the provisioning directory
- Update provisioning/p_manifest.json with all your IPK dependency files.
- See p_manifest.json Details for more information
- Modify the Install script if you need extra dependency installation or other install setup beyond installing IPK files. This script is used to install and uninstall your app. See Install Script for more details.
- Modify the Start script to start and stop your application process(es) as needed. See Start Script for more details.
- If you have config files you want to update through DeviceHQ, place them in the config directory.
- Modify status.json with the default AppInfo string of your choosing. See status.json Details for more details.
- Organize the rest of your application content within this directory any way you like. The Conduit only cares about the location of the required and optional files noted above.
- Create a gzipped tar file (tarball) of this directory, ensuring all required files are present and correct. The tarball doesn’t need to match the app name in manifest.json. The first level application content like manifest.json must be at the top level of the tarball just like the custom app template. To create a tarball on Linux:
$ cd <your_top_level_app_directory>
$ tar --hard-dereference -hczf <path_to_create_tgz>.tgz *
Example Applications (including Python alternatives to Node-RED)
- Nodejs app with web view: express-hello-world v1.4
- C++ app with boost dependency: boost-query-api v1.0.2
- Python gpio toggle (requires MTAC-GPIO accessory card): gpio-led v1.3
- Default application in Python and server with API implementation for a distributed LoRaWAN network: app-connect.py
- Simple webserver and API in Python (using Flask): https://github.com/russmin/webserver-python
- Convert NodeRED to Python and Python code using MQTT broker and LoRa: https://github.com/russmin/Node-Red-Python
Use Monit to Monitor Custom Apps
You can also use monit to monitor your custom applications. Refer to the monit page for information on installation of the monit package and its use.
Backup Custom Apps with User-Defined Defaults (UDD)
You can backup/save Custom Apps when you save them in User Defined Defaults of the device. You must install them in the /var/config directory using the User Defined Defaults feature.