Device Startup
The device requires a gateway and must first join it to execute functions. In order to
join, the gateway and the device must match configurations (network type, network name, network
pass phrase, frequency band [not configurable, either 915 or 868 mHz], and frequency
sub band).
Visit the Configuration Mode page for details on changing the device settings:
To start up the device:
- Power on the device using the switch on the left side.
- If you are powering up the device for the first time (if not, skip this), you must select
your region based on your channel plan. Browse using the SW2 button (Scroll) and
select your region pressing the SW1 button (Select) from the Select Region list
including: KR920, IN865, US915, AU915, EU868, AS923, or AS923-JAPAN. - The screen displays the MultiTech logo and product name. The LED1 (EVB: Top)
flashes green then turns red. - The software performs a GPS detect and lock (this may take a few
minutes). If no GPS is detected, the blue LED2 (EVB: Bottom) remains off. If a
GPS unit is detected, LED2 flashes until GPS locks and then LED2 stays on.
- The screen displays the product name and Select Mode with the
following menu options:
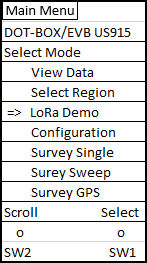
- View Data: Browse the data of previous surveys or sweeps.
- Select Region: Select the appropriate region based on your
channel plan/frequency. Your region was already selected at startup.
But you need to change the region, if you wish to operate the device
outside the originally selected area. - Survey Single: A single link check transaction with the gateway.
The device sends a request message to the gateway and the
gateway returns a response. - Survey Sweep: A series of Survey Single operations
across a range of data rate and TX power combinations. - Survey GPS: Survey GPS mode provides temperature and GPS
location data (if available) on screen in real time and also sends
this data to the gateway based on a selected interval. - LoRa demo: LoRa Demo Mode demonstrates typical device
usage. Sensor data is gathered and updated in real time. The
device sends the sensor data to the gateway periodically or
on a button press, depending on the mode selected. See
Internal Sensors for details. - Configuration: Modify the device settings using AT
commands. See Configuration Mode for details.
- If you are powering up the device for the first time (if not, skip this), you must select
- To scroll through the menu options, push the SW2 (EVB: Left) button (labeled
- Scroll) to move the selection arrow =>.
- To select a menu option, push the SW1 (EVB: Right) button (labeled Select) when the
selection arrow is on your desired option.